
 fxtadeusz@gmail.com
Bake classic gingerbread cookies full of warm spices and rich flavor. Perfect for holidays, decorating with family, or gifting as a festive treat!
Description: Discover the perfect gingerbread cookies recipe that combines traditional flavors with foolproof techniques. These soft, aromatic gingerbread cookies are ideal for decorating, building gingerbread houses, or simply enjoying with hot cocoa. With detailed step-by-step instructions and expert tips passed down through generations, you’ll master the art of making the best gingerbread cookies that stay soft for days.
Dear friends, there’s something truly magical about the moment when you pull a tray of perfectly baked gingerbread cookies from the oven. The way their spicy-sweet aroma fills every corner of your home, instantly transporting you to cherished holiday memories. I’ve been making these gingerbread cookies for over forty years, and each batch still fills me with the same joy I felt as a little girl watching my mother work her magic in our tiny kitchen.
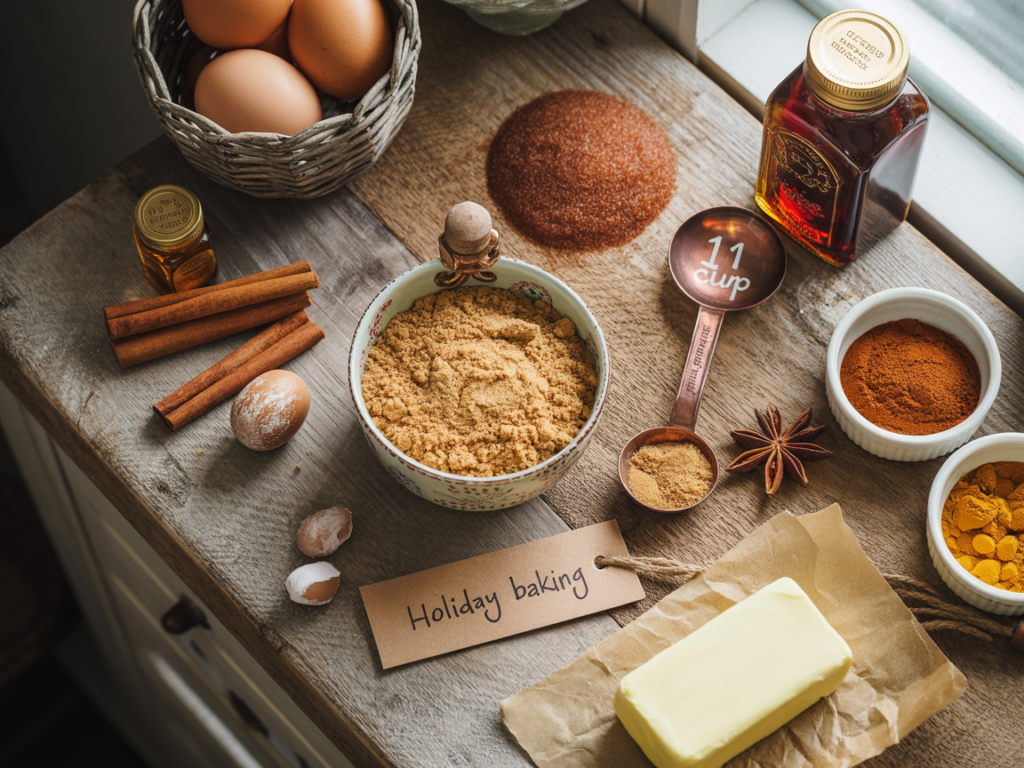
Here are all the treasures needed to create magical gingerbread cookies – each ingredient plays its vital role in this holiday symphony of flavors. Fresh, aromatic spices are the foundation of success – their fragrance should enchant you from the very first moment. Notice how the rich, dark molasses promises deep flavor, while the warm spices hint at the cozy comfort these cookies will bring
You know, when I first started baking, I made every mistake in the book. My first gingerbread cookies were so hard, my husband joked we could use them as roof tiles! But through years of practice, countless batches, and wisdom passed down from my dear mother, I’ve perfected this recipe. Today, I’m thrilled to share not just the ingredients and steps, but all those little secrets that transform good cookies into extraordinary ones.
The beauty of gingerbread cookies lies in their versatility. Whether you’re creating elaborate gingerbread houses, decorating simple gingerbread men with the grandchildren, or packaging them as heartfelt holiday gifts, this recipe delivers every single time. The dough is sturdy enough for construction yet yields cookies that are delightfully soft with just the right amount of chew. And oh, that flavor! The perfect balance of molasses sweetness with warming spices that dance on your tongue.
Let me tell you something important about spices – they’re the soul of these cookies. Fresh, aromatic spices make all the difference between ordinary and extraordinary gingerbread. I always tell my readers: if you can’t smell the ginger and cinnamon from arm’s length, it’s time for new ones. Don’t be shy with them either! Many recipes play it safe, but we want these cookies to sing with flavor.
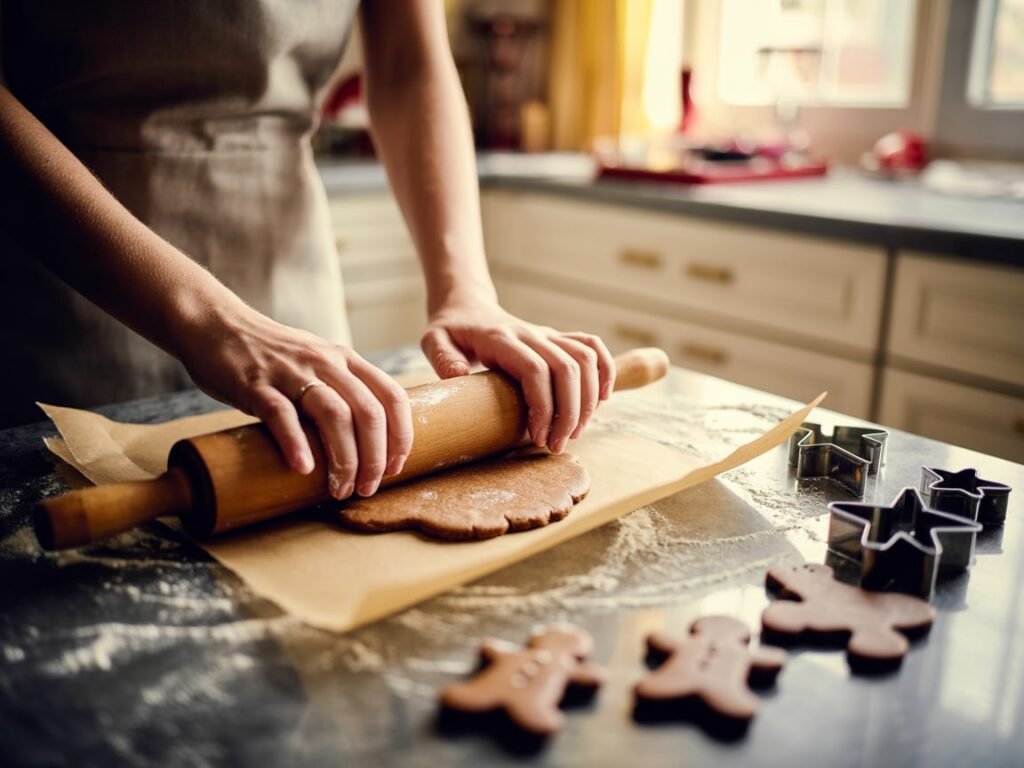
This is the moment when your kitchen transforms into a holiday workshop – every roll of the pin brings you closer to cookie perfection. Notice the even thickness of the dough, the key to uniformly baked cookies. The cookie cutters wait patiently, ready to create little edible works of art that will bring smiles to faces young and old.
Ingredients:
- 3 cups all-purpose flour (375g)
- 3/4 cup packed dark brown sugar (150g)
- 1/2 cup unsalted butter (115g)
- 1/2 cup molasses
- 1 large egg
- 2 teaspoons ground ginger
- 1 teaspoon ground cinnamon
- 1/2 teaspoon ground cloves
- 1/2 teaspoon ground nutmeg
- 1 teaspoon baking soda
- 1/4 teaspoon salt
- 1/4 teaspoon black pepper (trust me on this!)
Step-by-Step Instructions:
- In a large bowl, whisk together flour, baking soda, all spices, salt, and black pepper. The pepper might surprise you, but it adds a subtle warmth that enhances all the other spices beautifully.
- In a medium saucepan over low heat, melt butter with molasses and brown sugar. Stir constantly until the sugar completely dissolves and the mixture is smooth. This should take about 3-4 minutes. Remove from heat and let cool for 5 minutes.
- Once the mixture has cooled slightly (it should be warm, not hot), whisk in the egg vigorously until fully incorporated. The mixture should be glossy and smooth.
- Pour the wet ingredients into the dry ingredients. Using a wooden spoon, stir until the dough starts coming together, then use your hands to knead it briefly until smooth. The dough will be quite soft at this point – that’s perfect!
- Divide the dough in half, flatten each portion into a disk about 1 inch thick, wrap tightly in plastic wrap, and refrigerate for at least 2 hours or overnight. This chilling time is crucial – it allows the flavors to meld and makes rolling much easier.
- When ready to bake, preheat your oven to 350°F (180°C). Line baking sheets with parchment paper.
- Remove one disk from the refrigerator. Place it between two sheets of parchment paper and roll to about 1/4 inch thickness. If the dough cracks, let it sit for 5 minutes to warm slightly.
- Cut out shapes using cookie cutters, gathering and re-rolling scraps as needed. Place cookies on prepared baking sheets, leaving about 1 inch between them.
- Bake for 8-10 minutes for soft cookies, or 10-12 minutes for crisper ones. The edges should be just set and slightly darker than the centers. They’ll look underdone – that’s exactly right!
- Let cookies cool on the baking sheet for 5 minutes before transferring to a wire rack. They’ll firm up as they cool.
My Special Tips & Tricks:
Now, let me share some wisdom that only comes from years of experience. First, about that molasses – please use unsulfured molasses for the best flavor. Blackstrap molasses is too bitter for these cookies. If you can only find light molasses, that works too, though the flavor will be milder.
Temperature matters more than you might think. If your butter and molasses mixture is too hot when you add the egg, you’ll end up with scrambled egg bits in your dough. Too cool, and it won’t incorporate properly. Aim for comfortably warm – you should be able to hold your finger in it without discomfort.
Here’s a secret my mother taught me: after rolling out your dough, pop it in the freezer for 10 minutes before cutting shapes. This makes the cookies hold their shape beautifully during baking – no more headless gingerbread men or trees that look like blobs!
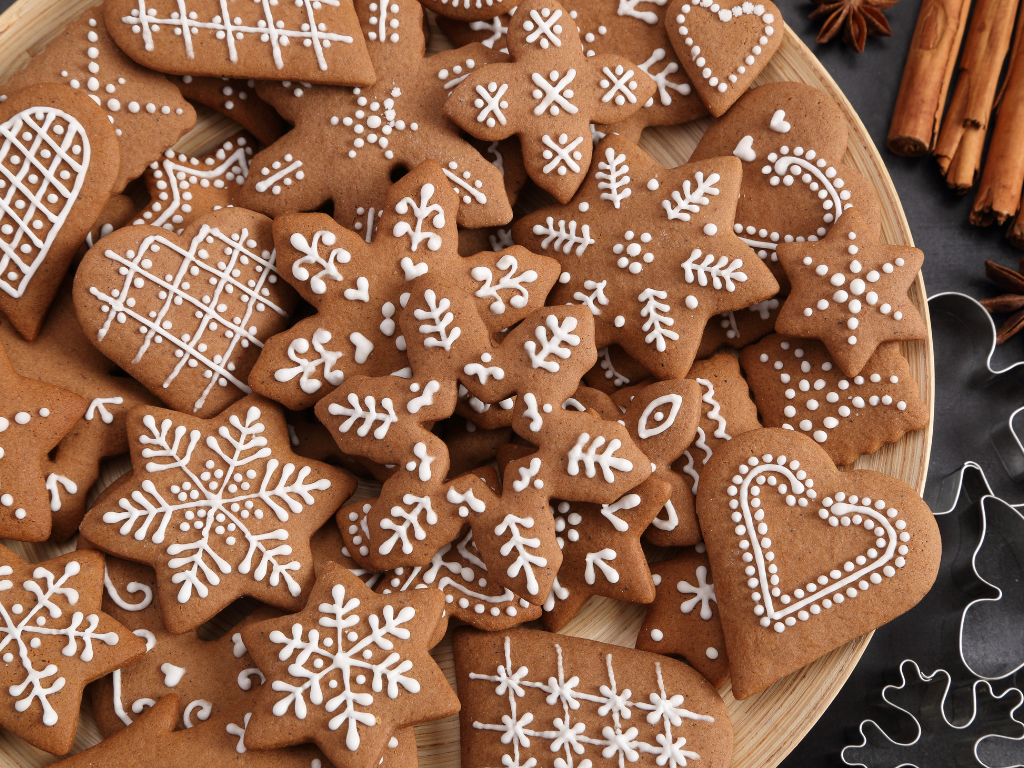
For decorating, royal icing is traditional, but let me share an easier option for everyday cookies: mix powdered sugar with just enough milk to make a thick glaze, add a drop of vanilla, and you’re done! It dries shiny and tastes delicious. If you’re making gingerbread houses, though, stick with royal icing – it dries rock hard and acts like delicious glue.
Over the years, I’ve experimented with countless variations. For chocolate lovers, add 2 tablespoons of cocoa powder to the dry ingredients and reduce flour by the same amount. The result? Gorgeous dark cookies with an even richer flavor.
Storage is crucial for maintaining that perfect texture. Layer cookies between parchment paper in an airtight container. Here’s the magic trick: add a slice of apple or bread to the container. It keeps the cookies soft for up to two weeks! Just replace the slice every few days.
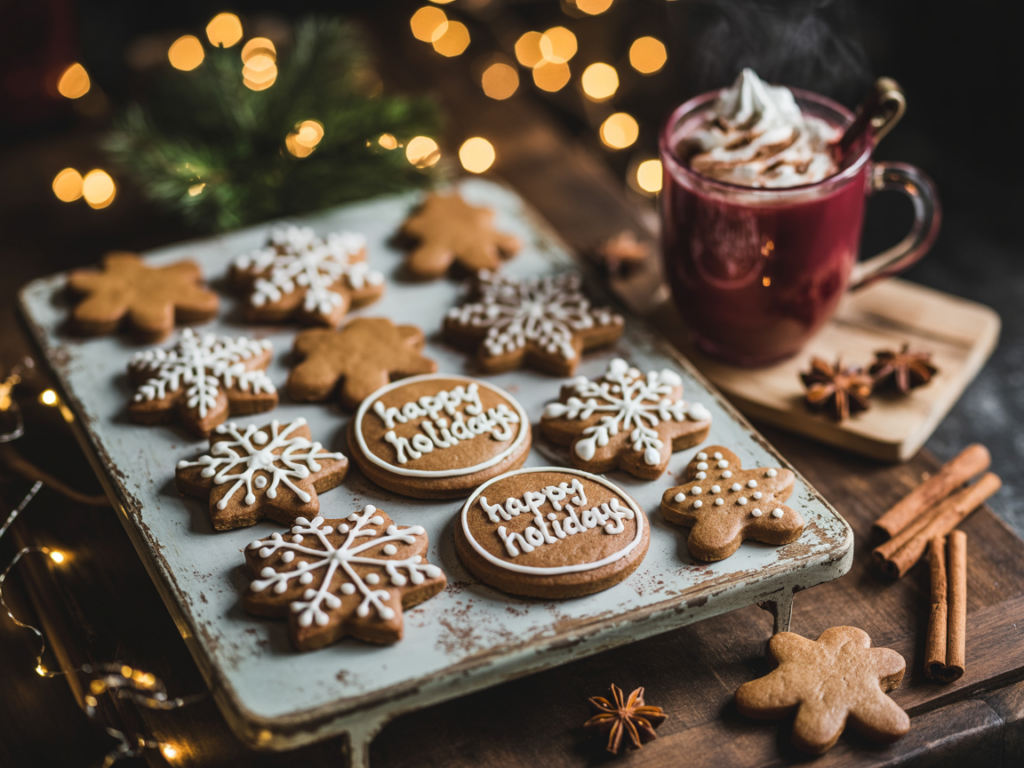
Here they are – perfect gingerbread cookies in all their holiday glory, some adorned with delicate royal icing, others left in their natural golden-brown beauty. Each cookie is a small masterpiece, ready to bring joy and create memories. Can you almost smell the warm spices and sweet molasses through your screen?
Variations and Creative Ideas:
Want to make these gluten-free? I’ve successfully used a 1:1 gluten-free flour blend, though the cookies will be slightly more fragile. Add an extra egg yolk to help with binding.
For an adult twist, add a tablespoon of finely grated fresh ginger and a teaspoon of black pepper for cookies with real zing! I serve these at my book club, and the ladies always beg for the recipe.
During the holidays, I love making gingerbread cookie sandwiches. Roll the dough slightly thinner, cut out matching pairs, and sandwich them with cream cheese frosting, lemon curd, or even Nutella. Divine!
The Story Behind These Cookies:
You know, every time I make these cookies, I’m transported back to my mother’s kitchen. She learned this recipe from her mother, who brought it over from Germany in the 1920s. Back then, they would age the dough for a full week in the cold cellar, believing it improved the flavor. While we don’t need to wait that long with modern refrigeration, there’s still something to be said for patience in baking.
My mother would make these cookies only during the holidays, turning our small kitchen into a wonderland of spices and sweetness. As children, my siblings and I would fight over who got to lick the molasses spoon and who got to use the special cookie cutters that came out only once a year.
Now, I make these cookies year-round, because why should we limit joy to just one season? I’ve taught this recipe to my children, and now my grandchildren stand on stools beside me, flour in their hair and excitement in their eyes, just as I once did with my mother.
Final Thoughts:
My dear baking friends, remember that perfection isn’t the goal – creating memories is. Some of my favorite cookies have been the imperfect ones: the gingerbread man with a crooked smile that made my grandson giggle, or the star that broke in half but tasted just as delicious dunked in milk.
Don’t be discouraged if your first batch isn’t magazine-worthy. Even after all these years, I still occasionally burn a tray or roll the dough unevenly. That’s part of the journey! What matters is the love you put into them and the joy they bring to those who eat them.
I encourage you to make this recipe your own. Add orange zest if you love citrus, experiment with cardamom for a Scandinavian twist, or try different shapes beyond the traditional. The best recipes are living things that grow and change with each baker who makes them.
So tie on your apron, preheat that oven, and let’s fill your home with the magic of homemade gingerbread cookies. And please, do share your creations with me – nothing makes me happier than seeing how this recipe brings joy to kitchens around the world!
Happy baking, and remember – the secret ingredient is always love!

Gingerbread Cookies
Ingredients
Instructions
- In a large bowl, whisk together flour, baking soda, all spices, salt, and black pepper. The pepper might surprise you, but it adds a subtle warmth that enhances all the other spices beautifully.
In a medium saucepan over low heat, melt butter with molasses and brown sugar. Stir constantly until the sugar completely dissolves and the mixture is smooth. This should take about 3-4 minutes. Remove from heat and let cool for 5 minutes.
Once the mixture has cooled slightly (it should be warm, not hot), whisk in the egg vigorously until fully incorporated. The mixture should be glossy and smooth.
Pour the wet ingredients into the dry ingredients. Using a wooden spoon, stir until the dough starts coming together, then use your hands to knead it briefly until smooth. The dough will be quite soft at this point – that’s perfect!
Divide the dough in half, flatten each portion into a disk about 1 inch thick, wrap tightly in plastic wrap, and refrigerate for at least 2 hours or overnight. This chilling time is crucial – it allows the flavors to meld and makes rolling much easier.
When ready to bake, preheat your oven to 350°F (180°C). Line baking sheets with parchment paper.
Remove one disk from the refrigerator. Place it between two sheets of parchment paper and roll to about 1/4 inch thickness. If the dough cracks, let it sit for 5 minutes to warm slightly.
Cut out shapes using cookie cutters, gathering and re-rolling scraps as needed. Place cookies on prepared baking sheets, leaving about 1 inch between them.
Bake for 8-10 minutes for soft cookies, or 10-12 minutes for crisper ones. The edges should be just set and slightly darker than the centers. They’ll look underdone – that’s exactly right!
Let cookies cool on the baking sheet for 5 minutes before transferring to a wire rack. They’ll firm up as they cool.

Frequently Asked Questions:
Q: Can I make the dough ahead of time? A: Absolutely! In fact, the dough improves with age. You can refrigerate it for up to 5 days or freeze for up to 3 months. Just thaw frozen dough overnight in the refrigerator before rolling. I often make a double batch after Thanksgiving and freeze half for Christmas baking.
Q: My cookies spread too much during baking. What went wrong? A: This usually happens when the dough is too warm or your oven temperature is off. Make sure your dough is well-chilled, and invest in an oven thermometer – many ovens run hotter or cooler than the dial indicates. Also, avoid over-creaming the butter mixture, as too much air can cause spreading.
Q: Can I substitute the molasses with honey or maple syrup? A: While you can substitute, it will significantly change the flavor and texture. Honey will make sweeter, softer cookies with a different flavor profile. Maple syrup creates a more delicate cookie. For true gingerbread flavor, molasses is irreplaceable. If you must substitute, use dark corn syrup for the closest texture match.

Really now, isnt saying never fails a bit too absolute? Even the most foolproof recipes can trip up beginners!
Isnt it weird how gingerbread cookies are associated with Christmas? Theyd be a great Halloween treat with some spooky icing designs!
Does anyone else think the secret to perfect gingerbread cookies lies in the type of molasses used? Debate me!
Anyone tried swapping molasses for honey in this gingerbread cookies recipe?
Has anyone tried swapping molasses for honey in this gingerbread recipe?
Has anyone tried replacing molasses with honey in this gingerbread recipe?